Certainly! Before we dive into the architecture of Kubernetes, it's important to understand its history and how it came to be.
Google introduced the Borg System around 2003-2004. It started off as a small-scale project, with about 3-4 people initially in collaboration with a new version of Google’s new search engine. Borg was a large-scale internal cluster management system, Following Borg, Google introduced the Omega cluster management system, a flexible, scalable scheduler for large compute clusters. In mid-2014 Google introduced Kubernetes as an open source version of Borg.
It was designed to manage the company's vast fleet of containers and has since become one of the most popular container orchestration platforms in the world.
Google donated Kubernetes to the Cloud Native Computing Foundation (CNCF) in 2015, and it has since become one of the foundation's flagship projects. CNCF is a non-profit organization that supports the development of cloud-native technologies, and its goal is to create a sustainable ecosystem for these technologies. By donating Kubernetes to CNCF, Google ensured that the project would have a neutral governance structure and a supportive community to drive its continued development and growth.
Kubernetes is an open source container orchestration platform that helps manage distributed, containerized applications at a massive scale. It was designed to run enterprise-class, cloud-enabled and web-scalable IT workloads.
By understanding Kubernetes' history, we can better appreciate its architecture and the problems it solves. Let's now delve deeper into Kubernetes' architecture and how it works.
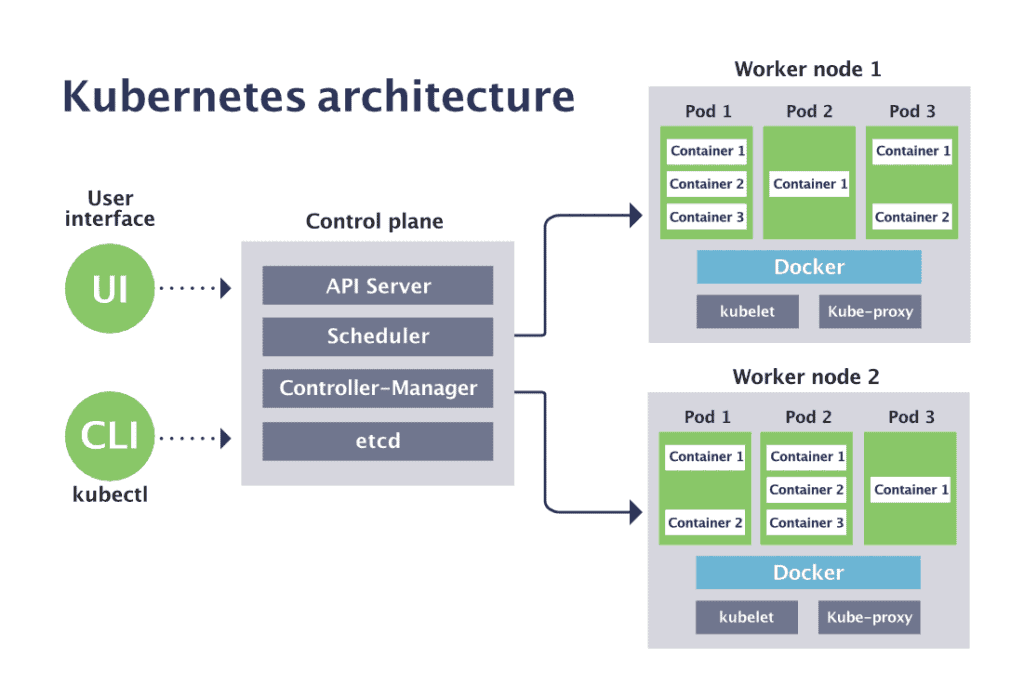
Before understanding the architecture, let's first look at the below Diagram:

A Kubernetes cluster has two main components—the control plane and worker nodes
The control plane hosts the components used to manage the Kubernetes cluster.
Worker nodes can be virtual machines (VMs) or physical machines. A node hosts pods, which run one or more containers.
Some basic terminologies:
Nodes: A node is a single machine in a Kubernetes cluster, either physical or virtual, that runs one or more containers.
Pods: A pod is the smallest deployable unit in a Kubernetes cluster. It contains one or more containers and is used to host applications.
Cluster: Multiple machines (physical or virtual) are connected to form a single, scalable, and highly available system to run applications. Each machine in the cluster is called a node and together they form a distributed system that can handle a large amount of workload.
Daemon: A daemon is a background process that runs on a computer and performs a specific task. A daemon can also refers to several different components that run as background processes on a node. Some examples of daemons in Kubernetes include the Docker daemon, which manages containers on a node, and the Kubelet, which communicates with the API server to ensure that containers are running as expected.
Namespace: A namespace in Kubernetes is like a virtual room within a bigger building (the Kubernetes cluster). Each room (namespace) has its own set of resources and access controls, but they are all located within the same building (cluster). This allows you to separate and organize your resources in a way that makes sense for your use case.
Kubectl: A command line tool for communicating with a Kubernetes API server, used to create and manage Kubernetes objects.
Ingress: Ingress is a collection of routing rules that decide how the external services access the services running inside a Kubernetes cluster. Ingress provides load balancing, SSL termination, and name-based virtual hosting.
Control Plane
A control plane serves as a nerve center of each Kubernetes cluster. The Kubernetes control plane is responsible for ensuring that the Kubernetes cluster attains a desired state, defined by the user in a declarative manner. The control plane interacts with individual cluster nodes using the kubelet, an agent deployed on each node.
It is also known as Master Node.
Here are the main components of the control plane:
API Server
Provides an API that serves as the front end of a Kubernetes control plane. It is responsible for handling external and internal requests. It receives all REST requests for modifications (to pods, services, replication sets/controllers and others)
The API Server is the only Kubernetes component that connects to etcd; all the other components must go through the API Server to work with the cluster state.
The API server can be accessed via the kubectl command-line interface or other tools like kubeadm, and via REST calls.
It is also responsible for the authentication and authorization mechanism. All API clients should be authenticated in order to interact with the API Server.
Etcd
A key-value database that contains data about your cluster state and configuration such as number of pods, their state, namespace, etc), API objects and service discovery details.
It is only accessible from the API server for security reasons. etcd enables notifications to the cluster about configuration changes with the help of watchers.
etcd is designed to have no single point of failure and gracefully tolerate hardware failures and network partitions.
Every node in an etcd cluster has access the full data store
Scheduler
The scheduler is responsible for scheduling pods to run on nodes based on available resources and constraints.
For example, if the application needs 1GB of memory and 2 CPU cores, then the pods for that application will be scheduled on a node with at least those resources.
The scheduler runs each time there is a need to schedule pods. The scheduler must know the total resources available as well as resources allocated to existing workloads on each node.
Controller Manager
The controller manager is responsible for several controllers that handle various automated activities at the cluster or pod level, including replication controller, namespace controller, service accounts controller, deployment.
It is responsible for running background tasks such as replication controllers, Namespace Controllers.
Controllers are control loops that continuously watch the state of your cluster, then make or request changes where needed. A control loop is a non-terminating loop that regulates the state of the system. In Kubernetes, a controller is a control loop that watches the shared state of the cluster through the apiserver and makes changes attempting to move the current state towards the desired state.
Some type of controllers are:
Node Controller: It handles situations where nodes become unavailable or get destroyed to keep our application running.
Replica Controller: It is responsible for monitoring the status of replica sets and ensuring that the desired number of Pod's are available at all times within the set. If a pod dies it will create another pod. It makes sure that desired number of pod's or at least one pod is in running state.
Job Controller: When a new task comes, Job controller makes sure that in the cluster, the kubelets on nodes are running a good number of PODs to complete the work.
Worker Node
These are nodes on which you can run containerized workloads. Each node runs the kubelet—an agent that enables the Kubernetes control plane to control the node.
Worker Node components run on every node, maintaining running pods and providing the Kubernetes runtime environment.
The worker Node has the following components.
kubelet
kube-proxy
Container runtime
Kubelet
An agent that runs on each node in the cluster. It makes sure that containers are running in a Pod.
When the control plane needs something to happen in a node, the kubelet executes the action.
It is responsible for registering worker nodes with the API server and working with the podSpec (Pod specification – YAML or JSON) primarily from the API server. podSpec defines the containers that should run inside the pod, their resources (e.g. CPU and memory limits), and other settings such as environment variables, volumes, and labels.
When Kubernetes wants to schedule a pod on a specific node, it sends the pod’s PodSecs to the kubelet. The kubelet reads the details of the containers specified in the PodSpecs, pulls the images from the registry and runs the containers. From that point onwards, the kubelet is responsible for ensuring these containers are healthy and maintaining them according to the declarative configuration.
Kube-proxy
Each compute node also contains kube-proxy, a network proxy for facilitating Kubernetes networking services. The kube-proxy handles network communications inside or outside of your cluster
To understand kube proxy, you need to have a basic knowledge of Kubernetes Service & endpoint objects.
Service in Kubernetes is a way to expose a set of pods internally or to external traffic. When you create the service object, it gets a virtual IP assigned to it. It is called clusterIP. It is only accessible within the Kubernetes cluster.
The Endpoint object contains all the IP addresses and ports of pod groups under a Service object. The endpoints controller is responsible for maintaining a list of pod IP addresses (endpoints). The service controller is responsible for configuring endpoints to a service.
Simply Service is a way to expose a set of pods internally or to external traffic and Endpoint object is responsible for maintaining a list of pod IP addresses (endpoints).
Kube-proxy is a daemon that runs on every node as a daemonset. It is a proxy component that implements the Kubernetes Services concept for pods. (single DNS for a set of pods with load balancing).
When you expose pods using a Service (ClusterIP), Kube-proxy creates network rules to send traffic to the backend pods (endpoints) grouped under the Service object. Meaning, all the load balancing, and service discovery are handled by the Kube proxy.
The main task of Kube-proxy is making configurations so that packets can reach their destination when you call a service and not routing the packets**.** This must be clear to you, in the very basic configuration, when you talk about kube-proxy it doesn’t route the packets, it makes configuration so that packet can reach the destination.
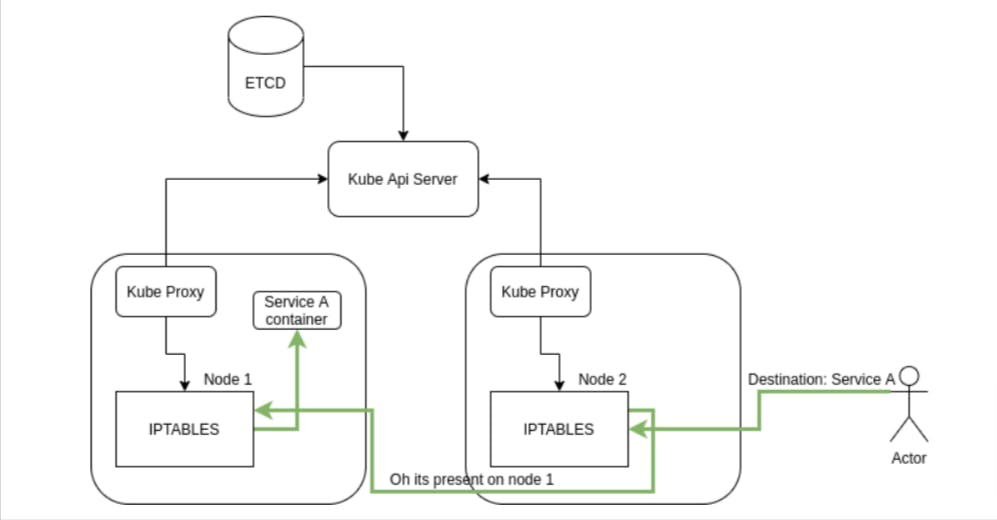
Kube proxy runs on each node and talks to api-server to get the details of the services and endpoints present. Based on this information, kube-proxy creates entries in iptables, which then routes the packets to the correct destination. When you create any service in Kubernetes, the traffic can come on any of the nodes, and then its iptables will route the packet to the correct node and after that, it can reach the correct pod.

Container Runtime
The container runtime, such as Docker, containerd, or CRI-O, is a software component responsible for running containers on the node. Kubernetes does not take responsibility for stopping and starting containers, and managing basic container lifecycle. The kubelet interfaces with any container engine that supports the Container Runtime Interface (CRI), giving it instructions according to the needs of the Kubernetes cluster.
Interestingly, Kubernetes does not directly support Docker, and in recent versions Kubernetes has deprecated Docker support. The reason is that Docker does not fully support CRI. It is technically possible to run Docker with Kubernetes, but in most cases, Kubernetes runs with other, lightweight container engines that are more suitable for fully-automated operations. You may wonder why you didn’t see Docker (a major container runtime) in the list above. Docker isn’t there because of the removal of dockershim — the component that allows the use of Docker as a container runtime — in Kubernetes release v1.24.
In Kubernetes, there is support for container runtimes such as:
containerd: An industry-standard container runtime with an emphasis on simplicity, robustness, and portability.
CRI-O: A lightweight container runtime specifically built for Kubernetes.
And any other implementation of the Kubernetes Container Runtime Interface (CRI) — a plugin enabling the kubelet to use other container runtimes without recompiling.
But not to worry, you can still use Docker as a container runtime in Kubernetes using the cri-dockerd adapter. cri-dockerd provides a shim for Docker Engine that lets you control Docker via the Kubernetes CRI. ****
Other Components
Apart from the core components, the kubernetes cluster needs Addon components to be fully operational. Choosing an addon depends on the project requirements and use cases.
Following are some of the popular addon components that you might need on a cluster.
CNI Plugin (Container Network Interface)
CoreDNS (For DNS server)
Metrics Server (For Resource Metrics)
Web UI (Kubernetes Dashboard)
I hope this post has given you a solid understanding of Kubernetes' architecture and its key components. If you have any questions or want to share your experiences with Kubernetes, feel free to leave a comment below.
Happy containerizing!🥳
Feel free to reach out to me on Twitter or LinkedIn
Share your opinions with me; it will help me get better.😊
